e. Test IO Performance
In this step, you run performance tests with IOR and evaluate how much throughput can be extracted. To measure throughput, you tune several IOR parameters to favor POSIX as an IO access method and conduct direct access to the file system. This approach helps you bypass almost all caching and evaluate the raw performances of Amazon FSx for Lustre. Further, you generate one file per process to saturate the file system.
IOR Options
For this test, you use the options listed in the following table.
| Option | Description |
|---|---|
-w |
Benchmark write performances. |
-r |
Benchmark read performances. |
-B |
Use O_DIRECT to bypass the glibc caching layer and reach the OS and file system directly. |
-o |
Benchmark file output path. |
-a |
Method to use, POSIX is selected for raw perfs. MPI-IO has data caching and skew the results. |
-F |
One file per process if present, shared file if not present. One file per process is the most intense. |
-Z |
Changes task ordering to random ordering for readback. |
-z |
Access is to random, not sequential, offsets within a file. |
-i |
Number of repetitions (use 5 as a good test, stdev should be minimal). |
-C |
Reorder tasks: change the task ordering to N+1 ordering for readback. Clients will not read the data they just wrote. |
You can find the full list of options for IOR in the IOR documentation. Do not hesitate to experiment with different parameters.
Verify that IOR is installed correctly by running the command ior in your terminal.
ior
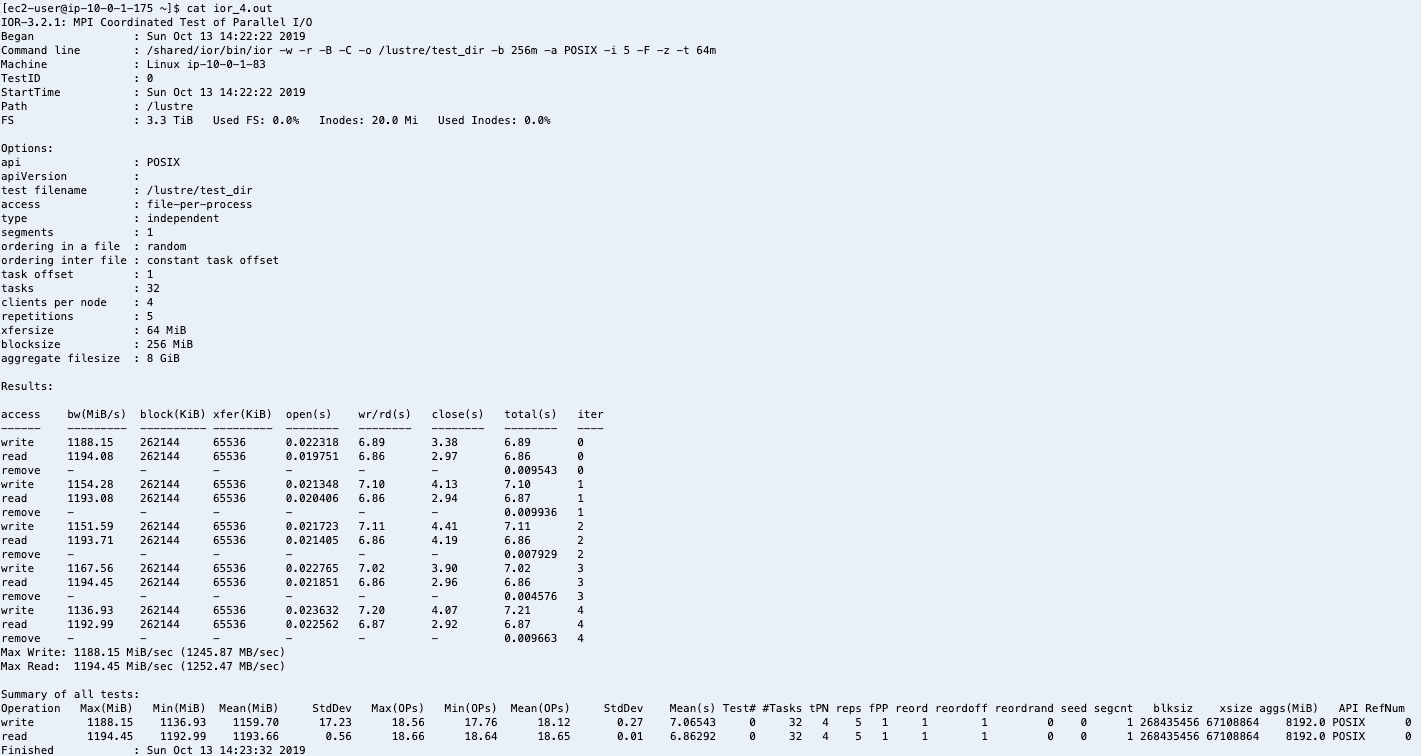
You should see a result similar to below. Don’t be alarmed by the numbers as there’s a lot of caching involved.
Run a Performance Test with IOR
In this step, you run your performance test using multiple nodes. In the following example, you use 8 c5.xlarge instances for a total of 32 processes. Each process writes 256 MB by blocks of 64 MB. You use the POSIX-IO method and directly access the file system to evaluate raw performances. The test is conducted 5 times to evaluate the variance, i.e. if performances are stable, for both read and write. You don’t need to wait between read and writes because results will not differ.
First, generate your batch submission script by copy and pasting the following code into your AWS Cloud9 terminal. Make sure you are connected to your cluster master instance.
# go to your home directory
cd ~
cat > ior_submission.sbatch << EOF
#!/bin/bash
#SBATCH --job-name=ior
#SBATCH --ntasks=16
#SBATCH --output=%x_%j.out

module load intelmpi
mpirun ior -w -r -o=/lustre/test_dir -b=256m -a=POSIX -i=5 -F -z -t=64m -C
EOF
Then, submit the script with sbatch as follows.
# go to home again
cd ~
sbatch ior_submission.sbatch
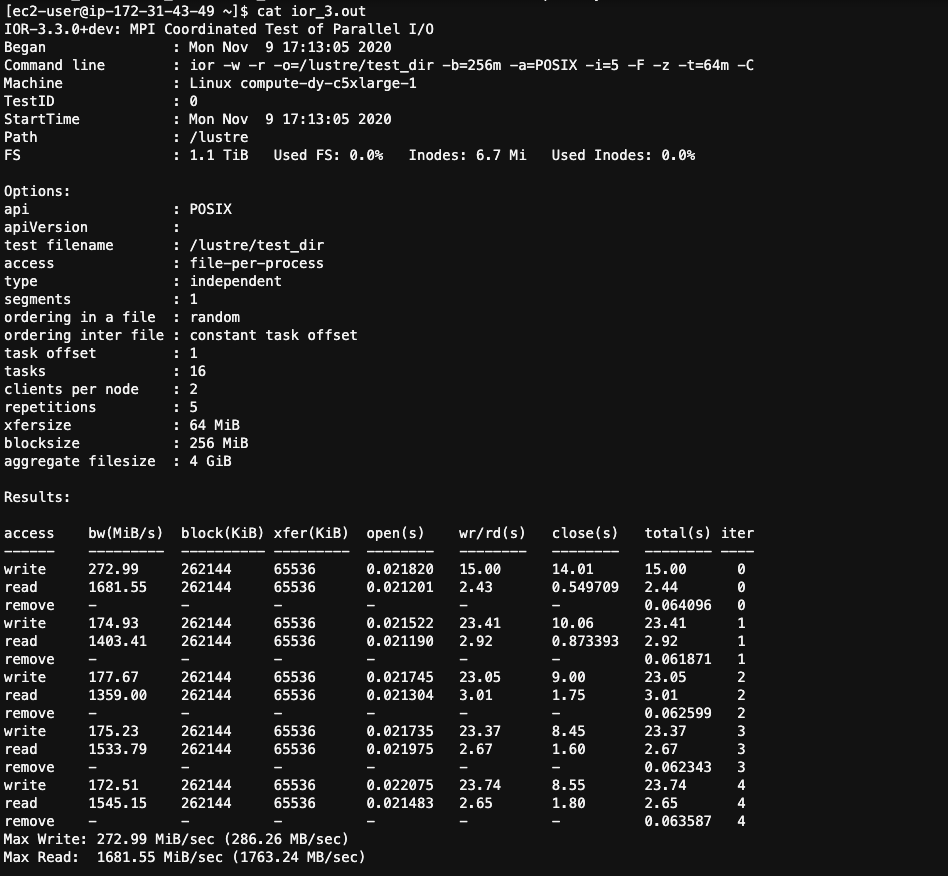
The IOR output is written to an .out file. If you want, you can use tail -f to view the file as it is written. However, remember that since you have 0 compute nodes present on your cluster, it may take a few minutes for instances to be created then register with the cluster. You can check the status of the instances on the EC2 Dashboard in the AWS Management Console. After the instances are created and registered, the IOR job will be processed.
You should see a result similar to the following image. In this example, you see 1 GB/s performance, which is not too far from the 720 MB/s offered by Amazon FSx for Lustre.
IOR is considered the standard tool in HPC to evaluate parallel file system performances, which makes it easy to compare results across systems. See also the IO500 Benchmark. However, feel free to try other IO performance testing tools, such as FIO or DD.
Metadata Test
Metadata functions are a critical function of distributed filesystems. Often metadata operations end up being a major bottleneck to scalability by nature of how client requests are serviced. Typical metadata operations involve gathering file attributes from multiple servers or a single metadata server responding to every client making the request.
We’re going to use mdtest to evaluate the metadata performance of the Lustre filesystem. For the test we’re going to use the following options:
| Option | Description |
|---|---|
-i 5 |
number of iterations the test will run |
-b 3 |
branching factor of hierarchical directory structure |
-z 3 |
depth of hierarchical directory structure |
-I 10 |
number of items per tree node |
-w 1024 |
number of bytes to write to each file |
-y |
sync file after write completion |
-u |
unique working directory for each task |
-d |
the directory in which the tests will run |
First create a submission file:
cd ~
cat > mdtest_submission.sbatch << EOF
#!/bin/bash
#SBATCH --job-name=mdtest
#SBATCH --ntasks=16
#SBATCH --output=%x_%j.out

module load intelmpi
mpirun mdtest  -i 5 -b 3 -z 3 -I 10 -w 1024 -y -u -d /lustre/testdir
EOF
Then submit the job:
sbatch mdtest_submission.sbatch
You can monitor the job’s progress by running squeue. Once it’s completed the ouput will be written to a file: mdtest_[job_id].out
You’ll see the results look like the following:
-- started at 10/01/2020 04:40:42 --

mdtest-1.9.3 was launched with 16 total task(s) on 2 node(s)
Command line used: mdtest "-i" "5" "-b" "3" "-z" "3" "-I" "10" "-w" "1024" "-y" "-u" "-d" "/lustre/testdir"
Path: /lustre
FS: 1.1 TiB   Used FS: 0.0%   Inodes: 5.7 Mi   Used Inodes: 0.0%

72 tasks, 28800 files/directories

SUMMARY rate: (of 5 iterations)
   Operation                      Max            Min           Mean        Std Dev
   ---------                      ---            ---           ----        -------
   Directory creation:       3431.708       3431.707       3431.708          0.000
   Directory stat    :      28235.413      28235.400      28235.406          0.005
   Directory removal :       9473.681       9473.676       9473.679          0.002
   File creation     :       8035.707       8035.704       8035.705          0.001
   File stat         :      36838.570      36838.503      36838.527          0.023
   File read         :      16929.167      16929.158      16929.163          0.003
   File removal      :      16861.872      16861.860      16861.866          0.004
   Tree creation     :        175.438        128.617        156.240         21.227
   Tree removal      :        208.332        181.817        195.706          8.746

-- finished at 10/01/2020 04:42:35 --